

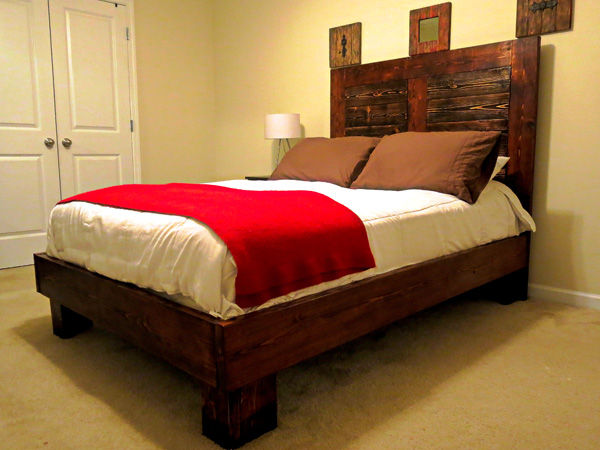
Full size bed
Introduction
This plan makes a bed for a full size mattress. If your mattress is not 54 inches wide by 79.5 inches long then you might want to adjust the plans to accommodate.
I have tried to ensure all steps are covered in these plans but if you find any errors in the plans or have a question then please email me at info@andrewharriswoodwork.com to let me know.
All my builds are made with pocket hole joinery. You will need a pocket hole jig tool such as a Kreg Pocket Hole Jig in order to build them.
Shopping List
| Size | Length | Quantity | Board Number |
| 1 by 2 | 6 Feet | Quantity 2 | 1, 2 |
| 1 by 4 | 6 feet | Quantity 11 | 3 – 13 |
| 1 by 6 | 8 feet | Quantity 3 | 14, 15, 16 |
| 2 by 4 | 8 feet | Quantity 2 | 17, 18 |
| 2 by 6 | 8 feet | Quantity 4 | 19, 20, 21, 22 |
| 2 by 8 | 6 feet | Quantity 1 | 23 |
| 2 by 8 | 8 feet | Quantity 2 | 24, 25 |
You will also need:
- Pocket Hole Tool such as a Kreg Pocket Hole Jig
- 25 inch pocket screws
- 5 inch pocket screws
- 5 inch wood screws
- 25 inch wood screw
- Wood glue
Estimated Material Cost: $160
Cut list
Please read all instructions before cutting wood as shown below. I suggest some pieces are cut as you go to ensure a tight fit.
To minimize the number of boards to use plan your cuts I have given details of which board I cut the piece from. If you find a more economical solution then please let me know.
| Size | Length (inches) | Quantity | Used For | Board Number |
| 1 by 2 | 67 | 2 | Side rail slat supports | Boards 1 and 2 |
| 1 by 4 | 54 | 11 | Slats | Boards 3 to 13 |
| 1 by 6 | 20 1/4 | 12 | Headboard Inserts | Boards 14 to 16 |
| 2 by 4 | 40 | 2 | Headboard support | Board 17 |
| 2 by 4 | 6 | 1 | Headboard support | Board 17 |
| 2 by 4 | 77.5 | 1 | Center rail | Board 18 |
| 2 by 6 | 13 | 8 | Legs | 3 from board 20, 3 from board 21, 2 from board 22 |
| 2 by 6 | 49.5 | 2 | Headboard Frame | Board 19 |
| 2 by 6 | 38.5 | 1 | Headboard Frame | Board 19 |
| 2 by 6 | 46 | 2 | Headboard Frame | Board 20 |
| 2 by 8 | 57 | 1 | Foot Board | Board 23 |
| 2 by 8 | 81 | 2 | Side rails | Boards 24 and 25 |
Step 1 – Make the feet
Make the four feet by joining the 13 inch lengths of 2 by 6 together. Use 2.5 inch pocket holes to join them on the inside.
Use glue as well as screws for added strength.
Step 2 – Make the foot board
Attach two of the feet to the foot board as shown. I used four 2.5 inch wood screws to fix each foot to the foot board.
If you don’t want to miter the corners that is fine you will just have to adjust the length of the side rails and make those a bit shorter.
Use glue as well as screws for added strength.
Step 3 – Make the headboard support
Make the headboard support from the other two legs already made and the two 40 inch pieces of 2 by 4 and the 6 inch piece of 2 by 4.
The back of the headboard support will actually be hidden by the head board and so you can place the pocket holes on the rear side so they cannot be seen.
Use glue as well as screws for added strength.
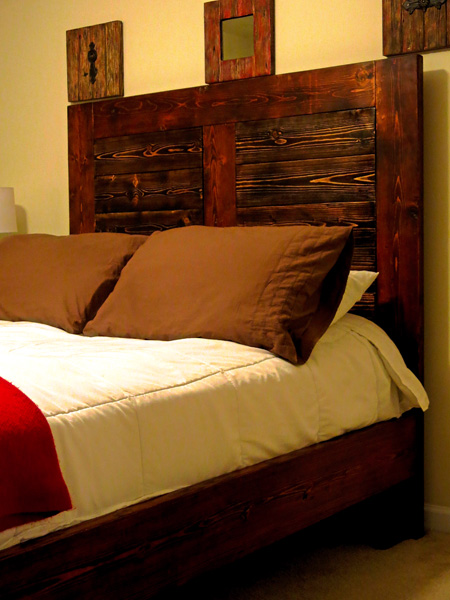
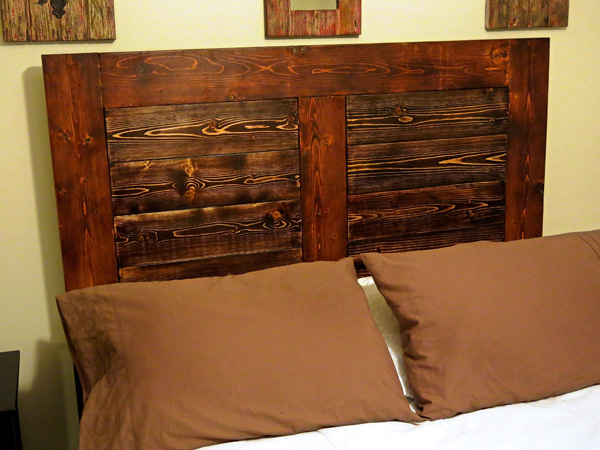
Step 4 – Make the headboard
Make the headboard frame from the two 49.5 inch 2 by 6 pieces, the two 46 inch 2 by 6 pieces and the 38.5 inch 2 by 6 piece.
Place the pocket holes on the rear side.
Step 5 – Add the headboard inserts
I stained the headboard inserts a different color so I fitted them and joined the actual insert boards together but did not glue. I then removed them so could stain them separately before refitting. If you are doing them the same color then you can leave them fitted.
Before fitting I roughly sanded the edge of each board to that when joined together it gave some detail.
Use the 20.25 inch 1 by 6 boards to make the inserts. I left the bottom one out as it will not be seen anyway and to save some wood and weight.
I made the boards flush on the side that would be showing and so there will be a 0.75 inch recess on the rear side.
Place the pocket holes on the rear side.
Step 6 – Staining/Painting
At this point I stained all the separate pieces of
- Footboard
- Headboard support
- Headboard
- Headboard inserts
- Side Rails
- Centre support rail
Step 7 – Fit Headboard inserts
If you decided to do the headboard inserts a different color then fit those into the headboard now.
Step 8 – Fit headboard to headboard support
Join the headboard support to the headboard making sure the bottom edges are flush and an equal gap on each side.
I used 2.5 inch wood screws and fixed through the back of the headboard into the headboard support
Step 9 – Fit the side rails to footer and headboard
This bed is heavy and so once you have it in the room it is going fit the side rails to the footboard and headboard.
I used 2.5 inch wood screws to fix through the inside of the foot into the rail and I also used pocket hole screws on the headboard end towards the top of the rail.
I didn’t use glue as thought maybe I might need to take it apart one day to move it elsewhere.
Step 10 – Add slat supports and center support
Add the slat 67 inch 1 by 2 inch supports to the inside of the outer rail making sure the top is flush with the top of the leg. I used 1.25 inch wood screws.
Add the center support as well using 2.5 inch pocket hole screws on the sides.
Step 11 – Add the slats
Add the slats. I found 11 slats gave more than adequate support and fixed in place at the edges with 1.25 inch wood screws.
